Crafting a lightweight markdown editor
16 Nov 2023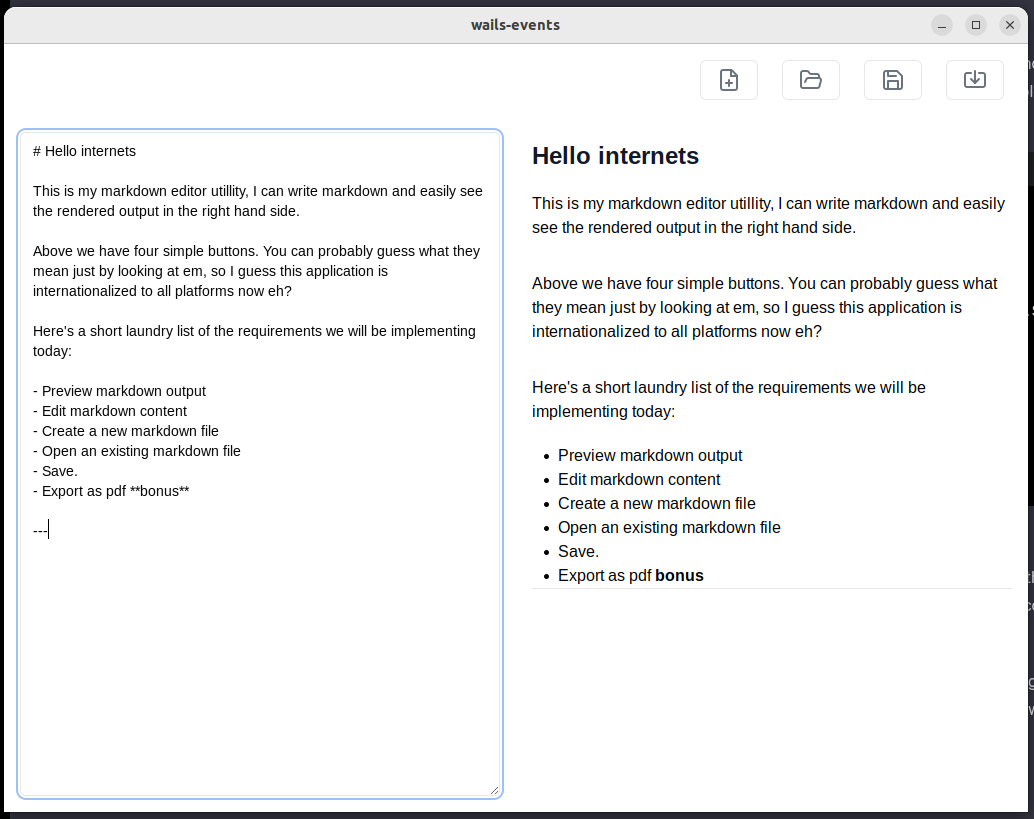
Building a Markdown Editor with Wails, React and Tailwind
Are you tired of dealing with the complexities and massive builds associated with Electron for desktop applications? Do traditional frameworks like QT, GTK, or Win32 make you want to cry? Today we are going to build a markdown editor using Wails, React and Tailwind.
Simplifying Desktop App Development
Building a desktop application has been an ugly duck since the dawn of web 2.0. The situation has been even more dire for golang enjoyers. You are forced into a few options, mostly wrapping existing UI libraries, and non of which really bring the productivity and joy of writing backend services using golang. The most popular option, Electron, is a huge stack of javascript, and while it's easy to get started, it's bloated and you are forced to write so much javascript that it's going to make you pull your hair out.
Let's delve into a better way, by creating a markdown editor using Wails, React and Tailwind.
Our basic requirements for this app will be:
    preview markdown text
    edit markdown text
    create a file
    save a file
    export a file (as pdf)
Step 1: Bootstrap!
Wails follows a Rails-like philosophy, providing a batteries are included and opinions come thick and fast. The opinion it does not have, is what html framework you use for the view layer. To make things really easy to get started, it makes it straight forward to kick start from templates.
Let's get started from this awesome pre-made vite+react+ts+tailwind template.
wails init -n write -t https://github.com/hotafrika/wails-vite-react-ts-tailwind-template
cd write
wails dev
Queue waiting forever to let npm install + build for the first time. This is a one time thing, and it's worth the wait, I promise!
Take a second now to get oriented, the structure is like so, and every wails app will look the same:
- build (contains built binaries, installers, etc)
- frontend (contains the frontend code)
- wailsjs (contains the go code)
- main.go (the entrypoint for the go code)
- wails.json (the wails configuration file)
- app.go (the main wails application file)
Let's start with the design: here is what I used, thanks to v0.dev for saving me all the time! This is pretty much a copy/paste job of the html into app.tsx. I chose not to import the v0 library -- I'm just not convinced it's worth it for such a simple design.
Step 2: Render and update markdown
Wails provides a server/client model, seamlessly wiring the Golang Backend to the Javascript frontend. In our markdown editor component you will see some simple snippets like this:
// at the start of the file
import {Save, SendMarkdownToRenderer, Open, Export} from "../wailsjs/go/main/App";


// inside the Component

 const updateValue = async (event: React.ChangeEvent<HTMLTextAreaElement>) => {

   const value = event.target.value

   const html = await SendMarkdownToRenderer(value)

   setMd(html);

 }

// many lines skipped ...

<textarea

           onChange={updateValue}

           ref={ref}

           className="flex min-h-[80px] rounded-md border border-input px-3 py-2 text-sm ring-offset-background placeholder:text-muted-foreground focus-visible:outline-none focus-visible:ring-2 focus-visible:ring-ring focus-visible:ring-offset-2 disabled:cursor-not-allowed disabled:opacity-50 w-full h-full bg-white dark:bg-gray-700"

           id="markdown-input" placeholder="Type your markdown here..."></textarea></div>
As you can see, we have a really simple textarea with an onChange function. When the textarea changes, an event is fired, the function gets called and we execute SendMarkdownToRenderer. The function is a code generated client that maps to Go code. Let's check that out.
https://github.com/ebuckley/write/blob/335bc096973f3b5a368e0257c1ffcd053a6c513c/write/app.go#L55C1-L60C1
func (a *App) SendMarkdownToRenderer(content string) string {

   a.markdown = content

   a.renderedHTML = lib.RenderMD(content)

   return a.renderedHTML

}
This fantastically simply little function is how we persist state to the 'server' and go context, and then pass back a string value to the client for rendering via the setMD state setter.
Important: there is a lot of cool stuff going on here. First of all, we have this really awesome code generation that just automatically happens as you save your files. A go function gets seamlessly and magically turned into something callable from a react application. This kind of magic RPC is really effective for a UI application where the server is close to the client, and it's just quite delightful for working with.
A fun digression: If you squinted at this you could look at the recent tech twitter memes about
'use server'and call this'use golang'.
Step 3: New file, Save File, Open file
To implement this trio of features, we are going to use the same exact pattern using onClick handlers for buttons. Again, we leverage the codegen that wails provides to automagically wire up. Let's dive into the Save function in app.go:
func (a *App) Save() (string, error) {

   hd, err := homedir.Dir()

   if err != nil {

      return "", err

   }


   chosenPath, err := runtime.SaveFileDialog(a.ctx, runtime.SaveDialogOptions{

      DefaultDirectory:          path.Join(hd, "Documents"),

      DefaultFilename:           a.filename,

      Title:                     "Save file",

      ShowHiddenFiles:           false,

      CanCreateDirectories:      true,

      TreatPackagesAsDirectories: true,

   })

   if err != nil {

      return "", err

   }

   err = os.WriteFile(chosenPath, []byte(a.markdown), 0644)

   if err != nil {

      return "", err

   }

   return chosenPath, nil

}
The framework provides a runtime package which allows calling a few functions which provide common cross-platform utility. Here, we call SaveFileDialog to present the user with a native and familiar way of choosing a filename and location to put the markdown. The function returns a path chosenPath and we use that in a straight up WriteFile call.
Our state a.markdown is kept in sync with the frontend via the previous onChange handler from step 1.
Travel warning: The SaveFileDialog takes a context, it's really important that this is a runtime context, the runtime context is stored on the app struct, and you need to always remember to pass this so that all the magic works! This planned to change in wails v3, but that is still in development at the time of writing this.
challenge
Take a look and see if you can find out how the New File and Open File work. Start out in app.tsx and trace your way back to app.go!
Step 4: Yak shaving markdown export
Ok this turned out to be a H U G E timewaste, but it was a lot of fun. As you might be aware, there are a lot of techniques for exporting PDF files, I decided to go for the native and non browser based pure pdf library fpdf. Thankfully, our markdown -> html compiler also supports extending via a renderer function and walking the parsed AST. I had a great time adapting a scuffed and minimalist little pdf renderer. You can check it out here.
For the wails part, it's again very simply an onclick handler for a button alongside an exported method on App.go We can simply take that markdown content and put it through our renderer, passing a path to save as a result from the SavefileDialog
Warning: don't use this pdf renderer code, it crashes on codeblocks! It's just an example approach which I think could be extended quite nicely.
Step 5: CI/CD
Eat your vegetables, make your code hygienic and never leave a bad build on origin main.
I went to the effort of setting up CI/CD for this project to show how you can cross compile for windows and linux. To do this I setup a github action which tests/builds on push and releases when you tag the repo with something matching v*.
Yes. You are seeing this correctly, it took me 16 builds to get a release. Anyway... So that you don't need to waste as much time, check out my deploy action here.
The interesting parts are:
- You need to install a few dependencies
sudo apt install libgtk-3-dev libwebkit2gtk-4.0-dev nsis - Don't forget to get the paths right
- Don't forget to use the permissions block in your action to allow it to cut new releases
- Copy the binary out of the build directory between builds, because
build/binwill be overwritten on builds
As a result, I think we have a solid base for a project which can be extended, bug smashed and it all gets automagically released through github actions. A nice place to stop for this little exercise.
Wrapping it all up with a disruptive and transformative conclusion
Wails is a gamechanger for GUI applications written in Golang -- simple, productive and downright magical.
You can think of it as a 'web style' MVC for your frontend, or 'use golang' for desktop applications. What sets it apart? Bring any frontend view layer! HTML to Svelte, it all works. Binaries are tiny 10Mb instead of electrons 100+Mb. As far as Golang desktop frameworks go, I think Wails is undisputed as our best option.
You can check out the code I wrote for this project here, and get started with wails here.